In the 2024 scenario, 85% of video marketers plan to spend more on the video. (Source: Video Marketing Statistics 2024 (10 Years of Data) | Wyzowl)
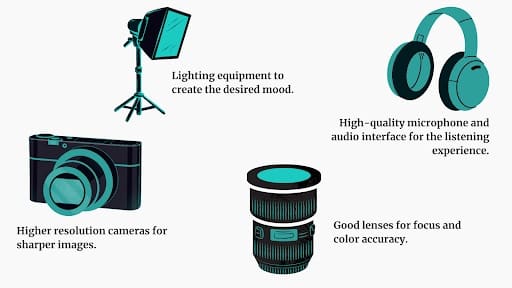
Your audience deserves the best, so why not invest in the best equipment? From amateurs to pros, the journey starts here.
We are calling out the budding filmmaker, content creator, or agency who is just dipping their toes into the video production industry. This guide will prepare you from the start to create a professional-level video.
| A Quick Look Into The Essential Video Production Equipment → Camera → Lenses → Audio set → Lighting → Stabilisation equipment → Editing tools → Accessories |
The Importance of Having the Right Video Production Equipment
Everyone is making videos, but tell me, are all videos delivering quality? The answers are few. Quality just doesn’t come from a story.
At this point, if your target is to grab the audience’s attention, you have to elevate your video production. It becomes more important if you are branding. And the right equipment is the weapon to conquer it—not just any random equipment but high-quality ones.
Your targets for equipment quality should be:
Cost vs. Value
Before you start researching, you have a budget in mind, right? If you are thinking of going for cheaper equipment, then let me stop you here. We know it’s a tempting and reasonable option, but there is a huge difference in quality. A low-quality camera will indeed have low-grade image quality, limited features, and a shorter lifespan. No doubt investing in quality will confirm its value in the long run.
| Features | Quality equipment | Cheaper alternative |
| Upfront cost | Higher | Lower |
| Long term cost | Lower ( Due to durability and resale value) | Higher (Due to frequent replacement and performance limitations) |
| Performance | Superior (Better image, clear audio, and advanced features) | Lower (Poor quality, distorted sound, and fewer features) |
| Versatility | More versatile ( covers various shooting scenarios) | Less versatile (Limited to specific use cases) |
| Resale value | Higher | Lower |
Building a Professional Setup
When you start with professional equipment, you are setting yourself up as a professional in the industry.
Your video quality has the potential to attract a larger audience and strengthen the foundation.
What you are going to do is you will take up all the benefits, such as:
- High-quality equipment can give your video a more polished and professional look and feel.
- Using top-rated equipment will offer you credibility and recognition as a professional creator.
- You will have the upper hand in terms of using equipment for various video-style techniques.
- If you own good quality equipment, you can be ready to match the futuristic technology.
Cameras: The Heart of Video Production
The camera. What other equipment can be there? You might even start recording with your smartphone, but hold one. You and I know how the image comes out from an advanced phone and a DSLR. That’s exactly what we are here to show you: THE DIFFERENCE in image quality.
Type of Cameras
1. DSLR
It stands for Digital Single Lens Reflex. It is a traditional camera with a mirror system that allows you to see through the lenses. Things you will get from a DSLR are:
- Optical viewfinder
- Interchangeable lenses
- Larger sensor size
- Low light performance
- Variety of lenses
- Perfectly fits beginners’ budget
2. Mirrorless
You are now seeing a modern camera that uses an electronic viewfinder instead of an optical one. It is comparatively lighter and smaller than the traditional DSLR. Not only offering portability, but also:
- Better video features
- Faster autofocus
- Smaller and lighter
- Chosen as beginner equipment for versatility and affordability
3. Camcorders
You might not notice this camera a lot around due to the popularity of DSLR and mirrorless cameras. However, it can still provide a longer video recording with a built-in microphone. What else they have to offer are:
- Image stabilisation
- Smaller sensor size
- Longer battery life
- Compact and easy to use
- Best for long-term videos and events
4. Cinema Cameras
If you are thinking of recording a high-quality film-like video, then here is the camera. They will match the production level you are thinking of. Things they will provide you to pull off a high-end video production are:
- Large sensor size
- Interchangeable lenses
- Advanced video features (example: RAW recording, timecode).
- Superior image quality
- Variety of lenses
- Compliment those who are aiming for a high-end cinematic look
Key Camera Features
What you should be looking for if you are investing in a good quality camera.
| Features | Explanation | Importance |
| Resoulation | The number of pixels in an image | High resolution, mostly 4K, will give off more detailed and better-quality outputs. |
| Frame Rate | The number of frames it can capture per second | Higher frame rates around 60fps have smoother motions and are perfect for slow-mo videos. |
| Sensor Size | The physical dimension of the sensor inside the camera | Larger sensors, mainly full-frame ones, capture more light. As a result, it shows better image quality and low-light performance. |
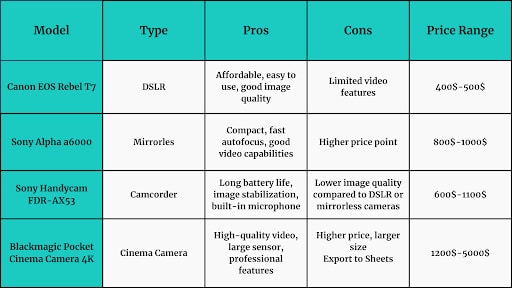
Recommended Camera Models for Beginners
Here is a treat for a beginner who is looking to buy a camera.
Lenses: Shaping Your Visual Story
The pair of eyes for your cameras. The difference a lens can bring to your video content is unimaginable. It can put various camera angles from depth of field to zoom capability. They will extend your vision for any shots that the camera alone can’t pull itself!
Types of Lenses
1. Prime Lenses
It has a fixed focal length that cannot be adjusted. The images it captures are sharper than those of the zoom lens, especially if they are taken at wide apertures. Many prime lenses have faster apertures (e.g., f/1.8, f/2.8), which allows more light to enter the camera. That means you get a shallower depth of field.
2. Zoom Lenses
Unlike prime lenses, zoom lenses’ focal lengths are adjustable. Thus, you will have more freedom in framing your shots. Zoom lenses are also convenient, as you don’t have to physically move your camera to capture various subjects. However, it can’t beat prime lenses because they are less sharp at the widest and narrowest focal lengths.
3. Specialty Lenses
Fisheye, Wide-Angle, Macro, and Telephoto lenses are considered specialty lines. They are designed for specific purposes. Their unique effects and capabilities make them stand out from mainstream lenses. Although, these lenses are costlier and less versatile.
Understanding Lens Specifications
1. Aperture
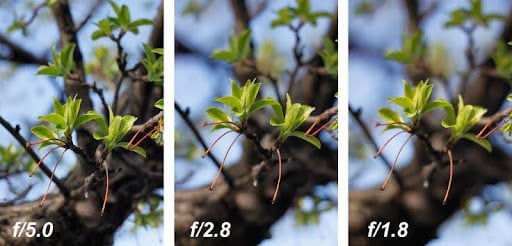
The opening of the lenses is measured as f-stops. When the f-stop is lower, such as f/18, it means a wider aperture. A wide aperture lets in more light, creating a shallower field depth.
2. Focal Length
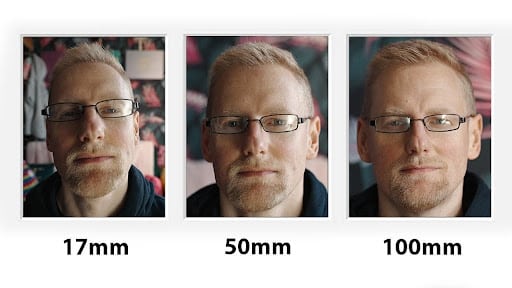
The light t we are talking about is the distance between the lens’s optical center and the image sensor. The shorter the length (e.g., 17mm), the wider the angle view. Similarly, the longer the focal length (e.g., 100mm) creates a telephoto view.
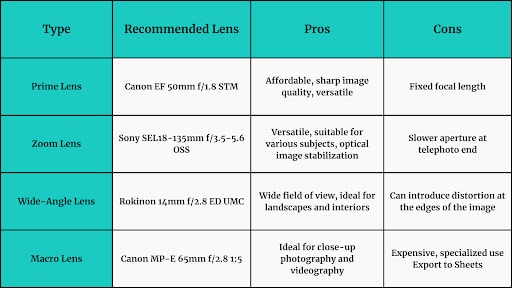
Lens Recommendations
Let’s look at the lenses that you might want to purchase.
Audio Equipment: Capturing Crisp, Clear Sound
The camera alone cannot grab an audience’s attention. They need clear sound to understand what is going on. When you have the proper sound system, crisp recordings bring the visual to life. But now the point is if you are going for microphones, which type should you get?
Types of Microphones
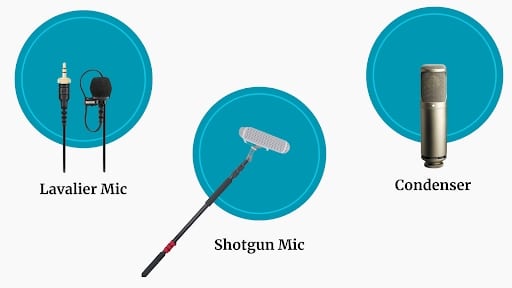
| Description | Lavalier | Shotgun | Condenser |
| Features | → Small → Discreet → Worn on the lapel or collar | → Capture sound from various directions | → Sound sensitive → Needs phantom power |
| Best use cases | → Interviews → Vlogging → On-the-go recording | → Filming interviews →Recording sound effects → Wildlife documentaries | → Studio recordings → Voiceovers → Podcasting |
| Advantages | → Portable → Easy to use | → Excellent directional pickup → Reduce background sound | → High-quality audio → Wide frequency response |
| Disadvantages | → Prone to a clothing rustling noise → Restricted audio quality | → Sensitive to wind noise → Needs to be placed carefully | → Might be sensitive to handling noise |
Audio Recorders
Portable Recorders
The name itself says what it is like. These recorders are small, handy, and specially designed for use in various field settings. Features they can offer are:
- Multiple inputs to connect multiple microphones
- High-quality audio for professional-quality results
- Built-in microphone for the convenience of use
- Timecode to synchronize audio with video
Dual System Sound Recording
The dual system records sound separately from the audio. On one side, you capture the video, and on the other side, you record the sound or voices on the tape machine. That way, you will have multiple advantages to work with:
- Flexibility over controlling audio editing
- Better quality by isolating unwanted sounds
- Backup audio track in cases of technical problems
- Timecode for synchronizing audio with the video
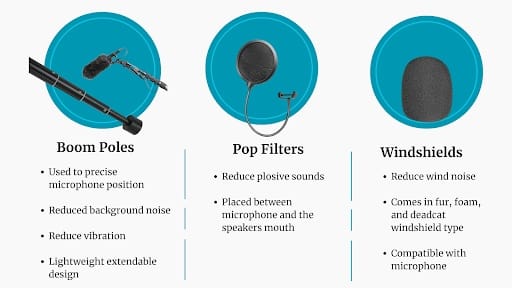
Audio Accessories
No, we aren’t exaggerating. Audio accessories are also a must-have to improve the audio quality. Once you are done installing accession, you will see how it enhances the audio and reduces unnecessary noise. Here are the accessories that will help:
Lighting Equipment: Setting the Mood
Lighting can transform even ordinary footage into top-rated movie shots. It enhances the mood, tone, and overall vision so the audience can feel every situation and ambiance. So, why not install lightning equipment as well?
Basic Lighting Setup
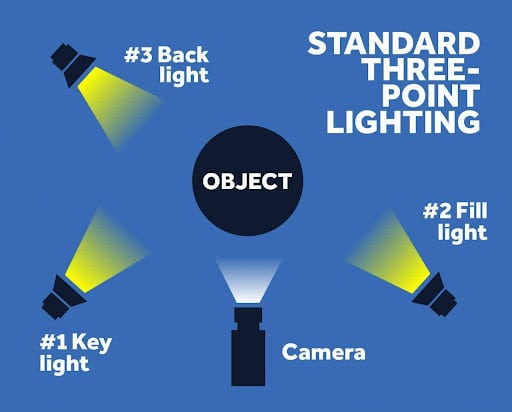
The three-point lighting technique is the basic lighting setup used by a video production house. First, we will define what those three-pointer lights are:
1. Key Light
This one is the primary light to make your subject look more prominent on the screen. It illuminates in a way that the whole scene takes into shape and tone. You will see key lights placed at a 45-degree angle to the subject, creating an intense, directional light. Your other lighting design will be based on it.
2. Fill Light
Fill light basically fills the darkness and shadows on the opposite side of key lights. It gives much more even lighting. As a secondary light source, it has a lower intensity. You can do it by moving away from the light a bit further.
3. Backlight
The last light of the three-point lighting setup is the backlight. It is placed behind the subject to create a halo effect. You will see how the backlight separates the subject from the background and highlights the contours. It is often placed at a higher angle than the key light.
Types of Lighting
Previously, we discussed the lighting setup, but one thing we added to it is the lighting types.
| LED Lights | Softbox lighting | Ring Lights |
| → Energy efficient → Available in various sizes and colors → Longer lifespan than a traditional bulb | → Soft and diffused light → Used fabric covers to spread the light → Ideal for portraits and interviews. → It can be used to soften harsh shadows. | → Soft and even light distributor → Perfect for close-up shots → Mostly used photography and video production. |
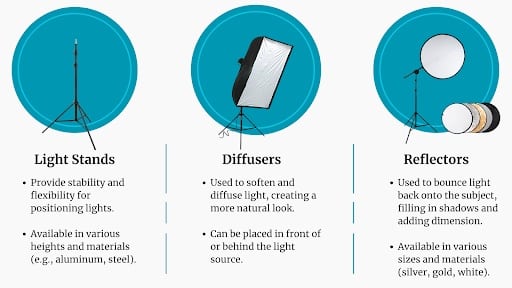
Lighting Accessories
With appropriate lighting accessories, you can soften the intensity of the light. It even allows you to control and direct the light as you want. You can easily create different lighting moods, from dramatic to soft. These are the accessories you can use to:
Light Kits For Beginners
There is always something for beginners; this guide also covers affordable video equipment. You will find several effective yet affordable lighting kits to begin your journey or just to learn in general. Popular brands like Neewer, Godox, and Yongnuo often offer a combination of LED lights, light stands, and accessories.
Stabilization: Achieving Smooth, Professional Footage
No one likes shaky videos, not even you. If your videos are unstable, they will also show on the screen. The audience will notice it and may even get distracted or irritated. So, it is best to maintain the stability of the camera, whether on a handheld device or other devices.
Now, what to do? No worries; here are devices that will support the stabilization for you without tipping down or making your videos flimsy.
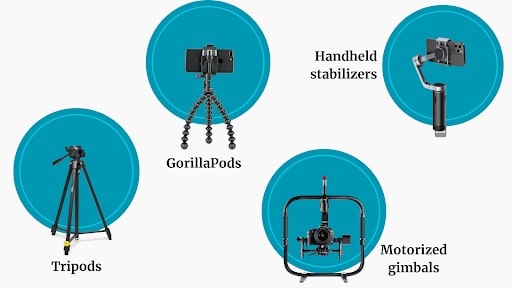
| Standard Tripods | Gorilla Pods | Motorized Gimbals | Handheld Stabilizers |
| → Perfect for steady shots → Adjustable height and leg angles → Have an option like pan and tilt head for smooth movement → Can bear the weight of camera and lens | → Flexible options for unusual angles → It can be warped around objects for a unique perspective → Smaller and more portable than tripods → Perfect for travel and situations where the tripod seems impractical | → Offer smooth and cinematic movement → Compensate for camera shake in all directions → It can be used as a handheld device → Expensive but provides the highest level of stabilisation | → For fun and go-to shooting → Less costly than motorized gimbals →Suitable for beginners or those on a budget |
Sliders and Dollies
This equipment has been used in the filmmaking process for years. Simply put, it is more like a tripod on a wheel. Sliders and dollies move the camera back and forth smoothly without breaking the scene. If you are unclear about what sliders and dollies look like, here is the reference photo.
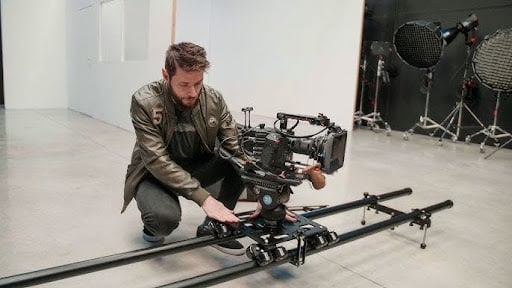
What This Equipment Does:
- Sliders move the cameras horizontally for smooth-moving shots.
- Dollies carry the camera vertically or horizontally for dynamic shots.
- It can be used to create smooth and cinematic transitions.
- Best for making professional-looking timelapse videos.
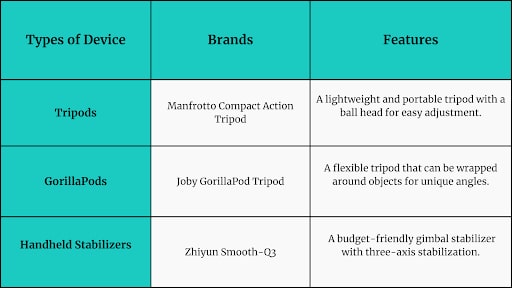
Best Stabilization Gear for Beginners
We have a few recommendations if you want to purchase stabilization for better camera movement. Check out these brands, as they have a good collection for beginners to try.
Editing Tools: Bringing Your Vision to Life
The next step is to edit the video you capture with high-resolution cameras and other equipment. This step is also crucial since the final product depends on it. We suggest using specialist editing tools because they make the process easier for editors and polish the raw footage into a cinematic sequence.
Computers and Monitors
These two things are the most important and necessary to begin the editing process. The hardware in it will make sure the video editing goes smoothly. Like:
- A powerful multi-core processor such as Intel Core i9.
- At the latest, 32GB is necessary to fill up the demands of the projects
- A dedicated graphic card (e.g., NVIDIA RTX, AMD Radeon RX series) to accelerate video editing tasks.
- A fast SSD card for storing your video files and editing projects.
Editing Software
| Beginner friendly Software | Professional Software |
| → iMovie: A nonpaid app for video editing with a simple and intuitive interface. It is available for macOS users. → Adobe Premier Rush: This one is cloud-based, so it can be used on desktop and mobile devices. | → Adobe Premiere Pro: A versatile video editing software with various features and expertise. → Final Cut Pro: A popular professional video editing software for macOS users. |
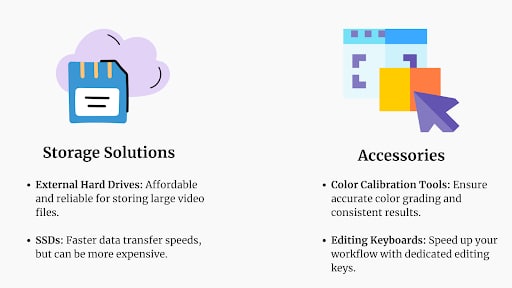
One more thing to add: check out these options if you are looking for storage or editing accessories.
Best Editing Setups for Beginners
This is how a beginner can set up a swift editing setup without initially purchasing unnecessary editing equipment.
- Purchase an affordable laptop with good specs. It can be a good starting point.
- Go for unpaid beginner-friendly editing software to practice.
- A large external hard drive so that you don’t run out of storage in the middle of the process.
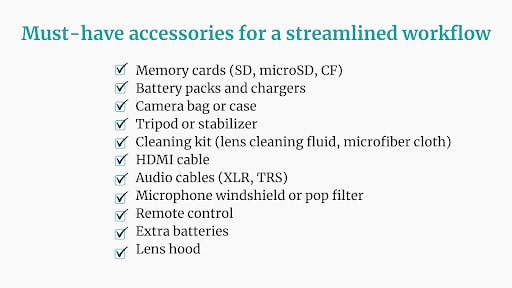
Accessories: Enhancing Your Video Production Setup
Accessories may appear optional, but they can enhance workflow by serving multiple purposes.
- Protecting your equipment
- Providing power to long shoots
- Ensuring data storage for footage
- Improving audio clarity with windshields and pop filters
- Enhancing image quality by protecting lenses
- Remote controls and editing keyboards to speed up your workflow
| Memory Cards | Battery Packs and chargers | Bags and Cases |
| → A fast memory card with higher storage capacity captures high-quality videos without interruptions. → Look for speed class, storage capacity, and brand reliability. | → Keeping your gear powered during long shoots with high-capacity battery packs. → Go for reliable chargers, battery capacity, and equipment compatibility. | → A sturdy and well-organized bag or case for transporting your gear safely. → Purchase backpacks, shoulder bags, and rolling cases of the appropriate size, padding, and durability. |
Best Accessories for a Complete Setup
Budgeting and Planning: How to Prioritize Your Purchases
You might be wondering why we are discussing the budget at this stage. We wanted to show you the equipment first, and then we will explain how the budget will work for it. Here are the key points you need to know:
1. Assessing your needs
- Identify your video production goals; ask yourself what type of videos you want to create and who your target audience is.
- Prioritise equipment based on your needs for specific projects.
- Research about the equipment costs.
2. Budgeting tips
- Set a realistic budget
- Prioritize essential items
- Consider renting or borrowing equipment
- Find good deals on refurbished equipment
- Negotiate prices
3. Upgrading over time
- Plan for future equipment purchases as your skills and projects grow
- Consider selling or trading in older equipment
- Keep aside a portion of your income for future equipment purchases
Frequently Asked Questions (FAQs)
The very first piece of equipment that is important to have in video production is the camera. It can be a DSLR, mirrorless, camcorder cinematic camera, or anything that goes with your project.
Yes, you can, but you should consider upgrading to a DSLR or mirrorless camera for better quality.
You should choose the microphone based on your specific needs or projects. A Lavalier microphone is ideal for interviews, while a condenser microphone is the best option for voiceovers.
DSLRs have optical viewfinders, and mirrorless cameras have electronic viewfinders.
It depends on your goals. Start with a basic setup and upgrade as needed. But we suggest that you accommodate a $1500 budget at first.
It’s not strictly necessary, but if you want to shoot a professional-level video, it will give you more control and features.
Depending on your needs, you can choose from Lavalier, shotgun, or condenser microphones that will fit your content.
You can improve the lighting by utilizing natural light, artificial lighting, or reflectors.
Do You Want to Buy Equipment or Hire a Team?
It looks like you have a lot on your plate when it comes to video production. Don’t worry. LocalEyes has a talented team and all the necessary equipment to help you create a professional video. From capturing the perfect shots to editing with top-notch tools, they’ve got everything you need. Or you can create your own using the list of equipment provided in this guide.

Founder at LocalEyes Video Production | Inc. 5000 CEO | Emmy Award Winning Producer